Pages

Thursday, October 22, 2015

Happy Dancin'

There's been lots of sewing going on these days, but not much stitching.  I've been working on some Christmas presents and have managed to finish a collection of things for my daughter.

Below is a pic of everything I've made:


At the bottom of this pile is the quilt that I talked about way back here in 2014.  Its been quilted and bound in the last few weeks.  I've also made a table runner (thrown over the arm), a throw pillow and pillow insert for it, and finally a pillowcase (laying over the back of the chair).

I'm very pleased with how its all turned out and I hope she will like it when I give it to her for Christmas.  :)

Monday, September 28, 2015

Me and a Biscornu

After my last finish, I went in search of what to work on next.  What about all that stuff in my WIP pile, you say?  They looked quite comfortable in that pile, so I thought I'd leave them there for now.  In all honesty, I did glance at them, but just didn't feel like working on them.

I think Victoria Sampler is my go to designer when I'm in doubt of what to do next.  I love how detailed their instructions are and I have a huge collection of their patterns.  Since I haven't worked on anything VS this year, it seemed like a good idea.  So, I went to my bin of patterns and found the VS file folder (its really quite thick) and decided on a cute little pattern called Bisornuments.

 I thought this is perfect. The little biscornus would be a perfect way to learn how to make one.  I'm probably the only one left that has never made a biscornu (my finishing skills really need some work).  And these are just so cute, don't you think?  These are designed by Linda Rosser for VS.


So, I then proceeded to read through the pattern and I thought, "Wait a second! I have the Beautiful Finsihing pattern for Biscornus."  And off I went to find it.


This has complete coloured instructions on how to finish all three biscornus (15 sided, 6 sided and 2 sided).  So, I thought this will be my next project!  So, then I went in search of some suitable fabric.  All I can say is I had no idea these little cuties would need so much fabric.  To make the pattern work out right, I need to stick with the 28 ct and I really wanted to use whatever I had in my stash.

This is what I found:

28ct Antique Ivory Cashel Linen
 Unfortunately, the picture doesn't show the colour as well as I'd like, but it is 28 ct Antique Ivory Cashel Linen.  This was the only suitable fabric that I had enough of for all three biscornus.  I really want them to be a matching set.  The threads won't be as prominent as they are on the antique white fabric used in the pattern, but I think it works well enough.

After finding the linen, the next step was to cut it.  I needed 21 4" squares and 2 8" squares for all three biscornus.  As you can see from the above pic there is quite a big stack of pieces there. The whole process of picking out the pattern, fabric and cutting it took a few nights lol.  I don't think I've put this much effort into the preparation and planning of a project in quite some time.


At this point, the threads and ribbon are sorted and the stitching is started.  One square is finished and the second one is started.  I think this will take  a few months to stitch since it's taken this long to get this far.  I really can't wait to start the finishing though! 

Do you have a finishing technique that you have wanted to try, but never got around to it or felt confident enough to do it?  I think the biscornu, for me, is a bit of feeling like I never enough time to really sit down and try it and a lack of confidence in my abilities to do it nicely.  I also think the the needleroll is something I've been putting off.  Maybe it will be next. :)

Well, we've been having some beautiful fall weather this week and the leaves are really starting to change.  As much as I hate the idea of what follows fall (snow) I love the cooler temperatures and bright clear days that this season brings.  


Have a great week!
Karen

Friday, September 25, 2015

Some Fall Stitching

Temperatures are really starting to dip around here.  Today, I don't think it went above 15 Celsius.  While stitching away in my stitching room tonight I had to put on a big warm sweater and almost turned the heat on.  We always try to wait until October before turning the heat on, but it's been a challenge these past couple of nights.

With the changing season, I've had the urge to stitch something Fall-like.  Although, after going through my stash, I realized I don't have a whole lot of Fall themed stash.  But I did find a freebie that I printed off a few years ago which could easily be converted to Fall colours.  You can still get the pattern on the DMC website for free.  

DMC Freebie: Falling Leaves
28 ct neutral linen
Colours converted to:
 WDW Celadon, GAST Cranberry and Gold Leave
Beads 03024
(Sorry for the shadowy pic.  I didn't realize it had such a bad shadow until I enlarged it here.)  

I think this would be really cute stitched over one.  When I first picked it up that was the first thing I thought, but after careful consideration (about 2 minutes of pondering) I decided to do it over 2 instead. I also like the DMC colour variations threads that the pattern calls for, but for this occasion I felt like making it more for Fall-like.


Friday, September 18, 2015

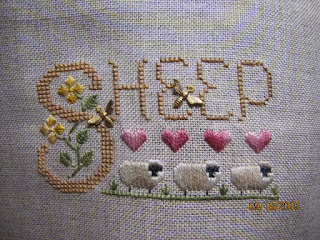
Cute little Sheepies

This is a cute little kit from Elizabeth Designs that I finished yesterday. I absolutely love these little kits that include everything.  They're like grab and go stitching kits and that give you almost instant satisfaction. Unless you lose the pattern... like I did haha.

Elizabeth's Designs
Complete Kit
The pattern decided to grow legs and hide a couple of years ago.  I searched high and low for it a couple of times and finally gave up.  I had the front picture, the fabric and all of the threads, but the actual pattern was no where to be found.  When I was putting everything away for Summer Tree of Stitches I found it.  It was in a plastic bag in my filing cabinet hidden between books (a spot that I searched a couple of times, so, one can only assume it decided to come out of hiding lol). So, this quick little finish was actually a couple of years lol.


Monday, September 14, 2015

Time for an update

You're not in the wrong spot, I just updated my colour scheme and template.  It's been awhile (hanging head shamefully) since I updated everything.  I kinda laughed when I picked this template since my blog title is Karen's Colourful Creations and I picked a beige template lol. 

Nothing new to post. 

Happy Monday!

Karen

Saturday, September 12, 2015

It's been awhile since I could.....

...do the big 'ol Happy Dance!!  Oh yea!!  I finally finished something.  :)


So, I think it's important to note that this is my rendition of Summer Tree of Stitches by Bees Needlework (aka The Stitch Specialist).  I deviated from the pattern quite a bit when it came to stitch placement.  I used the pattern as a guide and more or less filled in the sections with stitches as I saw fit.

I looked back in my notes and found that I started this back in 2013.  The plan was to stitch-along with everyone as each part was released, but I quickly got behind.  So, then it sat in the WIP pile for a very long time until about a month and a half ago.  That's when I got the urge to actually finish something in my big stack of WIPs/UFOs.

I picked up where the dark pink and light pink squares are and made my way from there.  I would love to be able to tell you which threads and fabric were used, but I have no idea.  I randomly picked threads and stupidly foolishly put the threads away when I was done with them.  You see, one of the tips in the notes at the beginning of the pattern was to re-use the colours to make the picture cohesive.  Well, let me tell you,  I had one heck of a time finding the yellow in the bees and the beehive from my stash.  I gave up on the blue/gray for the bench and used something similar for the reddish brown in the squirrels.  I was very fortunate to be able to locate the mauve that I used in the little tiny flowers at the bottom.

The final step was to add the beads.  The instructions only called for beads in three sections of the "leaves."  This didn't seem very cohesive to me, so, to unify the design I stitched beads EVERYWHERE.  I don't think I've added so many beads to anything ever.  And it was a challenge...especially after I spilled ALL of my beads twice and ran out with only one section to go!  I searched frantically through my stash and found a partial package of the same size and colour and was able to finish it off.

I think I'm sorta stunned to be able to say that it's finally finished.  I don't have very many finishes to boast about this year, so, it sure feels good to be able to cross this one off my list.

Here's some more pics for your viewing pleasure:

The first time I've every signed and dated something.

The little bullion knotted bees are my absolute favourite.

Love the little butterflies too.
This big stack of papers is the pattern instructions!  (can't really tell how thick the stack is from this pic, but you can take my word that the instructions are very detailed and there are pages upon pages of instructions).

So, I'll leave you with that and I hope you're all having a fabulous weekend.

Karen

Friday, September 04, 2015

The end of the season

Summer is coming to an end and quite coincidentally so is Summer Tree of Stitches.  I finished all of the leaves and now just have the ground work to complete.


Parts 8, 9, and 10 are finished.  These parts included the mauve laisy daisy flowers, the green reverse chain stitch (look like raindrops), and the yellowish rhodes hearts. Part 10 also included the satin stitched beehive with a smyrna cross for the entrance. To add some sparkle I used some Kreinik #4 braid or blending fillament here and there.


I'm now on Part 11 which includes this bench.  I have a counting error though and need to either figure out a work-around or starting tearing it out.  After the bench there are only a few flowers, bees, butterflies and a couple of animals left.


It's a beautiful sunny clear day today.  It's the first day that really feels like fall.  I can feel the crispness in the air.  Although, a relief from the extreme heat we had last week, it is sad to think another summer is ending.  

Thursday, August 27, 2015

A little of this ... and a little of that...

This summer is just flying by.  It's hard to believe it's August already and it seems too soon for leaves to be changing colour, but I found some this morning!

The weather this past week has been absolutely dreadfully hot hot hot!  The worst kind of hot. The kind that comes with mugginess, high humidity and no sun.  Everything has been sticky and gross.  It was so hot that I finally broke down and pulled out the portable air conditioner. 

The sun finally peaked through this afternoon.  Although, it's only going to last a couple of hours according to the weatherman, we're taking full advantage sitting outside and relaxing watching the birds and squirrels.  Below are some of the things we've been seeing a fair bit of in the backyard lately.  
Flicker
Blue Jay in the bird bath re-purposed as a bird feeder.

Squirrelly - I think I have a dozen of these little guys running around.
On the stitching front, I've worked away on Seville. I've used one full skein of yellow so far and I've only finished half of the first page. 

 Before:

After:


I've also worked on Summer Tree of Stitches, an old WIP that was a SAL in the Stitch Specialist Group on Yahoo.  This one is easily a couple of years old now, so I don't have a before pic to easily show what I've done.  I completed the light and dark pink square like stitches, the blue stitches and the light purple lazy daisies. 


 I think I'll stick with this one whenever I feel able to work on something a bit more complex because it's almost done.  It really reminds me of a whimsical tree from a children's book and each section of leaves should tell a story. 

Time to get back to stitching for a bit.  A la prochaine!

Karen


Sunday, August 16, 2015

Prick and Pounce and hand embroidery

Hand embroidery can be a bit daunting if you've never tried it before.  When using old retro designs, there is no colour pallette already decided for you and you also need to decide on the types of stitches to use.  Plus, there is the whole issue of transferring the pattern onto the fabric.  All of this takes some thought and some preparation.  

Another challenge in hand embroidery is transferring the design.  There are so many ways of doing it. Recently, I ordered the prick and pounce set from Berlin Embroidery.  After a lot of reading, it seems to me that this is probably one of the oldest ways of transferring a design and it looks like it still gives a crisper transfer.  


Pictured above is everything needed for using the Prick and Pounce method.  A steel pricker where a chenille #10 needle is inserted, a pouncer which is more or less a piece of wood that has pieces of felt attached to each end, a container of pounce dust and a Bohin retractable pencil that uses chalk instead of lead.  The kit includes white and grey leads and I chose grey pounce dust.  

I also ordered an extra package of needles because these ones seem pretty hard to find around here and a yard of cotton muslin that has a higher count than what I can buy locally.  The fabric is without those little puckery flecks that you get in the muslin that is used for sewing.  According to Tanja Berlin this fabric is ideal for thread painting, which is what I would really like  to try and it also makes a good backing when stitching on fabric that might be a bit too flimsy for hand embroidery.  

So, last night, I pulled out all of this stuff to give it a go.  I searched the pictures in the Hoop Love Group on Flickr (which is an amazing source for out of print retro transfer patterns that do not violate copyright policies).  I decided on a modern looking teacup pattern.  

The next step is to take a heavy piece of tracing paper and copy the design onto it.  It is recommended to use Vellum paper, however,  it's very expensive and difficult to find.  Vellum paper is a natural paper made from animal skin.  My kit came with a small piece of it, which I decided to save for later. 

I used Dura-Lar instead.  This stuff has a plastic feel to it which makes sense since it's synthetic.  It isn't cheap either (around $25 at Michael's), but more affordable than Vellum when you use a 40% off coupon to buy it.  It has the same level of transparency as Vellum and it is about the same weight, maybe a bit heavier.  The difference between the two is that Dura-Lar is extremely smooth and the Vellum paper has a bit of a grain to it which makes it stay in place better.  Also, I think it would be easier to pierce the Pricker needle through Vellum than the Dura-Lar.  


Once the design is drawn onto the transparent paper, you set it onto a towel or two and pierce holes on the lines all the way around the drawing.  The more holes pricked into the paper means the lines will be more complete because more pounce powder will fall through the holes. Below is the result.


The next step is to attach the drawing onto your fabric.  I attatched it with pins.  Then lightly dip the felted end of the pouncer into the powder and rub it over the holes in a circular motion.  This pushes the powder through the holes and onto the fabric.  

The very final step is to take the Bohin pencil and connect the dots on the fabric left by the pounce.  As you can see below, this process gave me a very crisp pattern on the fabric.  


Since I haven't actually tried an iron-on transfer, I can't really compare. However, I think this turned out well and aside from it taking awhile to prick the pattern into the paper, it is fairly simple.  I do understand why the iron-on transfers are probably more popular since it is probably a lot faster and not as messy.  The pounce powder is very fine and definitely a little messy.  

Now it's time to stitch!  Since I was testing this whole process out, I decided to put the pattern on a couple of little tea towels that I made a couple of years ago.  I always planned on embroidering something on them.  I simply stem stitched around the cups with Perle Cotton #8 in red (DMC 321).


This was a fun little project that was completed from start to finish in one evening.  My stem stitch might need a little bit of work, but I think the towels turned out pretty cute. 

Thanks for reading!

Karen

Friday, August 07, 2015

Simple things

Recently, I started a little Sweetheart Tree tiny sampler.  There is some over one stitching and some backstitching, and beading.  Oddly, the over one stitching didn't phase me at all, but when I got to the backstitching I sort of hit a mental block and had to set it aside.  It sat with just the center alphabet completed for a few weeks.  I worked on some other, simpler things in the meantime.  Anyways, tonight, I finally picked it back up again and decided to tackle the backstitching.  As you can see I didn't get too far, but it is a start.  (sorry for the blurry picture)

Tiny Spring Violet Sampler
Sweetheart Tree

I've been learning a lot of new stuff at work (I recently changed departments) and I haven't felt like exerting myself to work on anything too difficult.  So, while this cute little Sweetheart Tree pattern languished in the background I made up this cute little strawberry from the Covered Buttons kit by Jeanette Douglas.

Covered Buttons
Jeanette Douglas

This little kit is the cutest thing.  It includes the threads to make three little buttons and one button form. I still have a lamb and a flower to make and since I'm not sure which one I'll make into the button, I haven't finished the strawberry yet.

After I finished the strawberry, I still didn't feel like backstitching, so I looked for something that had no backstitching.  The first thing that caught my eye was an Assisi pattern in a recent Just Cross Stitch issue called Seville.  This pattern is exactly what I needed.  No colour changes, no backstitching.. just plain cross stitch that allows for some much needed meditative stitching.  It's quite a large design, but it's stitching up quite quickly considering the amount of time I've been able to put towards it.

Seville
JCS June 2015

It's being stitched on a piece of cream 36 count linen that has been in my stash for years.  I decided that it was time to use it up. For some reason I had a  bunch of this yellow DMC thread in my stash too, so, I decided to use it as well... I have no idea why I had so much of it in my stash, but I did.   I hope the yellow will be enough of a contrast,,,,

So, for now, I'm slowly working away on these and hopefully, eventually, I'll have the mindset to do something a bit more complicated.

Enjoy your weekend!!

Karen

Friday, July 24, 2015

Baa Baa Barn Sheep

I've been on a roll with smalls and was able to finish another one that has been in my stash for a long time.  Here's Baa Baa Barn Sheep:  

Myrtle Grace Motifs
Baa Baa Barn Sheep
Recommended hand WDW
32 count mystery fabric

It's stitched with three pieces of floss over two fabric threads on 32 count mystery fabric which gives it a nice dense look.   

The barn scene on the sheep probably isn't everyone's cup of tea, and to be honest, I don't think I would have picked this up if I hadn't seen it finished in the store.  But I'm glad I did.  It was fun to stitch and was finished up in just a few days.  

My final finishing mojo has vanished though and this one has been added to my pile of pieces waiting to be finished...eventually....

I hope everyone enjoys their weekend!
Karen


Monday, July 13, 2015

Jeanette Douglas Spring Quaker Pincushion

Jeanette Douglas has designed a few small kits and let me just say they are awesome!  I ordered a few of them a few weeks ago and below is the first one that I stitched.


The kit included the floss for the cording, the buttons, the linen, and the felt backing fabric.  All of this for just $15 CDN at Traditional Stitches.  I think that's a pretty good deal.  I only ordered the scissor fob from this series, but I think I'll have to get the other two because I loved stitching it and putting it together so much.  

Below is a close-up of the front:  (sorry for the blurriness. I used the macro function on my camera, but it didn't seem to work.)


And the back....:


After I stitched the cute little Quaker design, I knew I would have to finish it right away...  I want to finish everything lately.  This was only my second time making twisted cording and I still can't believe I have put off making this stuff for so long.  Jeanette includes complete finishing instructions with the kit too.

Well, there you have it.  A cute little scissor fob and it only took a day or so to make.  If you haven't seen Jeanette Douglas' little kits, you should check out her site.  I've been enjoying kits a lot lately and I will probably get a few more of these.  They are such cute quick little projects.

Thursday, July 09, 2015

Teeny Tiny Tea Time Bunny

I was gifted with the cutest little kit a couple of weeks ago. It was so adorable that I started stitching it immediately.  It stitched up so quickly that I decided to go ahead and do the final finishing as well. 

Tea Time Bunny Tiny Tin Cover
by
Lorri Birmingham Designs

 Tea Time Bunny is stitched over one on 28ct Monaco Fabric and it certainly tested my eyesight!  It's not the first time that I've stitched over one, but I definitely haven't done it very many times.  

It's mounted on a teeny tiny Altoid tin.  I have never actually seen these tiny tins before.  To give perspective as to how tiny this is, I set my embroidery scissors beside it in the photo.  

The design itself is utterly adorable.  Who doesn't like bunnies?  And a bunny in a teacup is just too cute.

I haven't done very much finishing over the past couple of years, but I have been feeling the urge to finish everything lately.  This tiny little tin was the first tin cover that I've ever done.  It's also the first time I've ever made my own cord.

I've had "The Spinster: Cord, Trim, Rope" tool in my stash for years, but this was the first time I have ever dug it out to try it.   I can't believe I let it sit in a drawer unused for probably 7 years!  Crazyness!!  It was so simple to use.  It even comes with instructions to make beaded rope and bullion trim.  I'm really quite curious how the beaded rope would turn out....

 The above picture doesn't show the sides of the tin, but I glued some white rick rack around it to make it look pretty.  Overall, I'm very happy with how it turned out.

Something else that I finished awhile ago was "Butterfly Lace."  I'm not sure if it will stay as it is or not, but I thought I'd share what it looks like for now.


I mounted it in a shadow box that I bought at Michael's some time ago.  It was the only one they had at that time that had a padded backing that you could stick pins into.  Also, it's a rectangle (like most store bought frames), which isn't the most flattering for this very square design  I think it would look better in a white square frame.

In order to mount this in the shadow box I needed the piece to be finished around the edges so, I hemstitched it and I placed a piece of pink fabric on the back to show off the drawn and pulled thread stitches.  To balance it in the rectangle frame I added the piece of lace to the side and attached a small butterfly charm that I had in my stash.  I still felt like it needed something and scrounged around in my stash for a piece of pink ribbon to make into a little bow.

I'm not overly thrilled with how it turned out which is probably why I never bothered sharing the final finish with you all until now.

Over the weekend, I was in Homesense and they had a nice assortment of shadow boxes with padded backings.  They even had a square one (albeit a bit large for this).  But I bought it anyways because I love how simple it is to pin something into them and how easy it is to change them around for different seasons. 


One thought that I had was using the Butterfly Lace design in this along with some other pieces.  Kind of making a collage of stitched pieces.  Do any of you use shadow boxes to frame your pieces?

Thanks for stopping by! I always appreciate your comments.

Karen

Monday, June 29, 2015

Finally - a finish!

Yup, that's right.  I managed to stick with something long enough to finish it off!  The design that kept me going long into the night was Quaker Gardens by Blackbird Designs.  I was determined to finish it last night before going to bed.  

This pattern sat all kitted up in my stash for literally years.  While searching for my next projects I would always take this one out and admire it and then file it away for "next time." 

Well, Quaker Garden's time to shine finally came around and I enjoyed stitching every little bit of it. 


Quaker Garden
Blackbird Designs
Recommended threads and fabric

The grayish blue and and the bits of white really pop off of this fabric.  And the pink adds that bit of colour that really captured my attention with this design.  All of the Quaker style patterns that I like are the more colourful and this one with its little pops of colour fitted that category perfectly.  

Another thing about Quaker patterns that draws my attention is the assortment of motifs.  This one is rather small, so it only has a few.  But the ones that attracted me to this pattern were the little moth and the bright flower at the top.  

In general, Quaker patterns aren't really what I'm drawn to when it comes to stitching.  I believe this may be the first bigger one that I have stitched (if you really want to consider this larger.. it's really not that big).  I always thought they would be tedious to stitch and many are not designed with a lot of colour.  But having said that, I really enjoyed stitching this one.  So much so that I may select another one from my stash to work on next.  I have Rosewood Manor's Spring Quakers all kitted up somewhere.......

'Til next time,

Karen
 

Saturday, May 30, 2015

A little progress X by X

I've made very little progress on my newly started pieces and I have no idea why.  I should be working away at these designs.  I love all of the patterns and the colours and look forward to seeing them finished, but my attention span doesn't last for more than a few minutes these days.  I pick up one piece and set it aside after a few minutes to work on something else.  By the time I get everything pulled out for the next design I end up making very little progress (if any at all). 

 Needless to stay, I've had another new start.  I wonder if anyone can guess what this is?  It was a really popular Blackbird Design back a few years ago.


Did anyone guess what it is?  If you guessed Quaker Gardens, then you'd be right!  I'm not much of a Quaker pattern girl, but this one really appealed to me at the time.  So, I hopped on the Blackbird Design bandwagon and bought everything for it years ago.  

After having it collect dust for several years in my "To Do" bin, it appealed to me again.  I thought if I could pick up something that only had cross stitching in it, I might make some progress.  And I did make a bit of progress, but unfortunately I had to pull a bunch of it out. Someday I will learn how to count accurately lol. 

I'm not sure if anyone else out there enjoys reading old diaries or letters of famous people, but I do.  Maybe I'm just nosey, but I love to read actual letters and stuff.  My latest find was Van Gogh's letters translated into modern English and very easy to read.  I just bought this a few days ago and I'm already a quarter of the way through! 


It is all correspondence that he had with his brother, Theo.  It shows the sketches and paintings that he is talking about in his letters along with actual pictures of the letters.  Anyways, I love reading it and I can see reading it more than once. 

Well, breakfast is ready, and my cup of tea is calling so I best go.  I wish all of you well and hope that you have a beautful weekend filled with good weather and lots of fun.

Thanks for visiting!

Karen

Tuesday, April 28, 2015

Feelin' busy

Last weekend was one busy weekend!  We decided to go to for a day trip which coincidentally happened to be where my LNS is.... so, of course I stopped in.

I picked out a counted canvas pattern called Tiptoe Through the Tulips and all of the stuff I needed for it.  I love doing these needlepoint designs, but my oh my the supplies for them add up quickly.


As you can see, I was so happy to get this that I started it as soon as I got home.

The other pattern I bought is one of Cathy Jean's latest designs, Laughing in Flowers.  I bought the thread pack for it as well and will start it soon. I still seem to be having a case of startitus lol.  I want to work on everything all at once.  I have a feeling this will be started in the very near future lol.


The other thing I bought was a spool of the gold sparkly ribbon I needed to finish off my last Holiday Ornament. which I also finished as soon as I got home.  This is it with the last two corners finished off.  


 And this is a pic of all four completely finished.


It may have taken me a few years to complete this set, but I'm glad I did in the end. Now to decide how to finish them off....

 I'll leave you with a pic of my crazy pooch....


Karen

Thursday, April 23, 2015

Catch up

It's been awhile, I know.  I have been severely neglecting my blog and for the most part stitching in general.  Recently, I picked up a small little ornament that I was working on before Christmas and I enjoyed placing the simple Xs on this simple little design and it's all sort of snowballed since then.  I've finished this cute little Prairie Schooler design a couple of weeks ago.

Prairie Schooler
Snowy Nights
Just Cross Stitch Christmas Issue 2010

I wanted to start something else, but kitting things up just doesn't appeal to me right now, so, I've been looking for things that are simple to set up and that are all ready to go.  I've had this needlepoint for years now and had only one ornament left to stitch to finish off the kit.  It was sitting out on a table so, I just grabbed it and started working on it.  It is American Quilt Collection Holiday Ornaments Series 1.  As you can see, there are two corners not completed...  I ran out of gold ribbon.....


Below are all four of the ornaments.  They are so vibrant and cheerful.

American Quilt Collection - Holiday Ornaments Series 1


After this, the startitus began.  I decided I wanted to work on my Hardanger skills so, I started these blocks from the Janice Love  Basics and Beyond book.  I decided to stitch a bunch of blocks first and then I'll finish each one with a separate filling stitch from the book.


So, my interest in Hardanger faded while working on the buttonhole stitch (probably one of my least favourite stitches) on the first block as you can see above.  I started looking through my old finishes (I have a huge pile of things that need to be finish finished) and got the finishing bug.  

The Butterfly Lace Sampler is one of my favourite finishes and has been sitting in the finishing pile for years.  I always wanted to put it in a shadow box type of frame, but couldn't decide how to go about it.   At first, I thought maybe buttonhole stitching around it and pinning it to the shadow box would work, and I started stitching it, but it didn't add anything to the design.  Then it struck me to hemstitch it and pin it to the box.  


So, I prepared it for the hemstitching and now just have to do the actually hemstitching.  Below is the box I plan on putting it in with a little lace placed accross the top and bottom maybe.


Now you ask, why didn't I finish the hemstitching?  Well, at the time I didn't feel alert enough to work on it so I set it aside.  But having the itch to stitch I started looking through some things that I had kitted up already (I still didn't feel like pulling threads and fabric and figuring things out).  I came accross The Drawn Thread Easter Egg Sampler which I have wanted to do for a couple of years now.  Now, Easter has been over for a couple of weeks now, but I still decided to do it.  And below is as far as I got with it.


The leaves are actually buttonhole stitched lol.  I just can't seem to get away from that stitch.  Below is ia pic of what it will eventually look like.


So, that's where it's at.  I have a few BAP to work on, but don't feel like pulling them out right now.  I'm sticking to relatively small designs and I'm trying to keep myself interested.  It would be such a shame to stop stitching when I have so many beautifully things in my stash that need to be stitched! 

Since I've been gone for so long, I don't expect to see too many readers come by my blog, but to those of you that stop by, thanks for taking the time to read my blog!  :)

Karen